Posts

Showing posts from April, 2012

Faux Piped Binding

Image
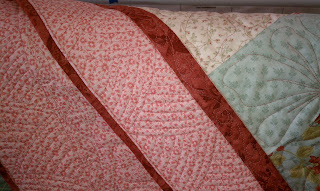
This is a fun, fast way to finish your binding entirely by machine and add a little pizzaz to your finished quilt.  I may update this another day because when I made this one, I did not consult my notes.   What you need to remember is that the fabric for the piped edge should be the one that is cut larger.  Believe me, I won't forget this again!   Cut your strips @ 1 5/8" for the piping and 1 3/8" for the binding fabric (finishes @ 2 1/5" binding).  Prepare each of those fabrics in the same manner as your would for regular binding, joining to obtain the length needed for your project.   Press those seams open.  Once you have the length for each color needed you will join those strips together.   Sew right sides together using 1/4" seam.   I like to press the seam flat just like the seam was stitched.  This will distribute the thread nicely thoughout the strip.  If you want a piped look, press the seam allowance toward your piping fabric, if you want a flat,

10 minute block

Image
This is my first 10 minute block quilt, worked up in romantic, soft florals.  I sewed the blocks over Easter weekend from a pack of pre-cuts that I have been hanging on to for years.   The fabrics speak to me  but I did not have enough of this set for most of my projects.   This little baby quilt was the perfect project to finally break them out of their little tin. I'm also trying some new techniques.  The center is stitched in a  simple free-hand flower petal of sorts in the blocks, TT in the centers. New to me is the CH woven border that I'm not so sure about yet.   But that's why I'm trying it on something small.   I used a remnant of a poly batting for this little quilt to get lots of dimension but now I'm quilting it flat in the border!  I initially thought I would do a 1/2" crosshatch but it looked too open, so had to fill in to 1/4".   Maybe should have worked this out with a smaller arc to get a deeper curve, my CH looks rather flat.  But that&#
Image
Another finish off the frame yesterday.   This belongs to a friend.  We made our tops almost 2 years ago, original post here.    The fabrics and pattern is Jungle Junction by Robert Kaufman.   I had so much fun quilting mine and now I got to do different designs for her quilt.  I don't want to bore you but I have to include all the animals - they are just too cute!  

Hmmmm... Intelligent!

Image
My 13 year old summed this up very nicely.   Before, my longarm was not very bright but now she's intelligent! My sewing/quilting studio is in the loft of our new house.  What little lighting there is in that room does not fall over the longarm.   I set up  gooseneck floor lamps but they don't illuminate the area that well and I need to see not only around the needle area but just in general reaching for rulers, markers, snippers etc.  Directly overhead I have the attic entry and a return for the HVAC.  We found the perfect solution.  Delivered and installed on Sunday afternoon.   Now I finally get some time to see how bright that girl really is! Before: After:

Four Square

Image
The most recent customer quilt came off the frame Saturday,  must say it looks awesome draped over my railing facing my family room!   But off it goes back to it's real home. some texture shows from the backside.